I asked my two year old son what kind of cake he wanted for his 2nd birthday. He was a Blippi obsessed boy at the time and had his heart set on a Blippi themed birthday cake. This was the very first gluten free cake I decided to make from scratch because I wanted to be able to enjoy cake at my son’s party, too. The gluten free vanilla cake recipe I used in the recipe card below is adapted from Gluten Free on a Shoestring’s vanilla cake recipe. I just made a couple adjustments and used Cup4Cup Multipurpose gluten free flour. Everybody at the party LOVED this cake and had no idea it was gluten free until I told them. My picky brother-in-law even said he prefers this cake now when I bake any cakes!
How I made this amazing Gluten Free Vanilla Cake

To make this Blippi cake, I made the vanilla cake recipe as instructed in the recipe below. I use Cup4Cup Multipurpose flour on all my baking recipes. It has worked really well compared to some other flours I have tried that are gritty. I also highly recommend weighing all your ingredients instead of measuring. In the notes section of the recipe, I talked about the use of cake strips. This is optional, but I find the cake strips help with producing more evenly leveled cakes after baking. You can purchase the ones I have or you can make your own which I discuss in DIY Cake Strips For Even, Flat Cake Layers.
How to add the Blippi theme to a cake
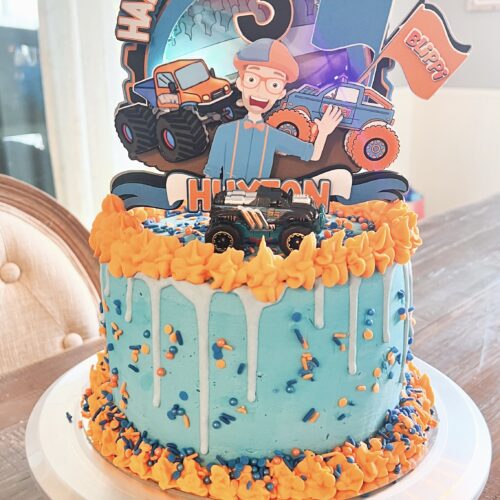
First, I separated the frosting into two batches, 3/4 of the batch for the blue, and 1/4 for the orange. I used these Wilton Icing Gel-Based Food Color jars to get the colors shown, slowly adding coloring in using a toothpick. Continue whipping the icing and then adding additional coloring until you reach the color and darkness you are aiming for. I used this cake drip from Walmart for the lighter color dripping and just added a couple drops of the blue gel coloring.
For cake decorating, I started out using this cake decorating kit from Amazon. It has done great for me. I used a cheap piping tip that I had on hand already but if you are buying tips for future decorating, I would recommend getting a Wilton set.
Decorating the cake with a Blippi theme
How to Get Flat, Even Cake Layers
Take your layers out of the freezer and ensure the layers are level for stacking. If you use cake strips on the pans, you will have more even, level cake layers. If you don’t, you can cut the frozen cake layers with a serrated knife. To use cake strips, you can purchase the ones I use in the link above, or you can make your own which I discuss in How to Make DIY Cake Strips for More Even, Level Cake Layers. It really does make a difference!
The Crumb Coat
Next, I did a crumb coat. This is a thin initial coat on the cake. I put one cake layer down on the cake stand, frosting on the layer, then placed the second layer on top. I put the crumb coat of frosting on the rest of the cake, smoothed it out with the stainless steel scraper, and then put it back in the freezer. This helps with keeping crumbs locked in while decorating and getting a smoother finish. If I’m decorating right away, I will freeze the crumb coat for about 30 minutes.
Icing and Decorating the Blippi Themed Cake
Next up is the finished coat of frosting. Pull the cake out of the freezer and start putting the frosting on either with a piping tip or with a spatula. I use a spatula and then smooth out the top with an offset spatula and the sides with stainless steel scraper. I rinse the scraper in warm water as needed to clean the spatula between scrapes. Using a turn table makes this process so much easier! After I was happy with the smoothness of the frosting, I piped the orange frosting around the edges of the top and bottom of the cake.
At this point, I added the cake drip around the edges and then threw on the sprinkles and the cake topper!
I purchased the cake topper from this Etsy shop. I did a custom order since she didn’t have a Blippi listing. She is very creative and created it just how I wanted it. When you click on her shop, you’ll see several examples of other characters.
Blippi Themed Gluten Free Vanilla Birthday Cake
Equipment
- 1 stand mixer hand mixer can also be used
- 2 8 inch cake pans
- 2 mixing bowls
- 2 cake strips and parchment rounds optional
Ingredients
Dry Ingredients
- 2 1/3 cups (322g) Cup4Cup Multipurpose Gluten Free Flour have not tested this recipe with any other flours
- 1/2 teaspoon baking soda
- 2 teaspoons baking powder
- 1/2 teaspoon kosher salt
- 1 teaspoon xanthan gum omit if using Cup4Cup flour
Wet Ingredient Mixture
- 4 (100g) egg whites at room temperature
- 1 large egg at room temperature, see notes
- 1 1/3 cups (10 2/3 oz) buttermilk at room temperature
- 1 tablespoon pure vanilla extract
- 10 tablespoons (140g) unsalted butter at room temperature
- 1 1/2 cups (300g) granulated sugar
Buttercream Frosting Ingredients
- 1 cup (225g) unsalted butter at room temperature
- 1 lb (454g) confectioner's sugar
- 1 tablespoon vanilla extract
- 3 tablespoons heavy cream
- 1/2 teaspoon salt
Instructions
Cake Instructions
- Preheat oven to 350 degrees. Grease two, 8 inch round cake pans with nonstick baking spray and line the bottom of each pan with round parchment paper or rounds. I usually spray before and after I put the rounds down.
- First mixing bowl: sift the 2 1/3 cups (322g) Cup4Cup Multipurpose Gluten Free Flour and 1 teaspoon xanthan gum (if not included in your flour blend) in a bowl. Add the 1/2 teaspoon baking soda, 2 teaspoons baking powder, and 1/2 teaspoon kosher salt. Whisk well and set dry ingredients aside.
- Second mixing bowl: whisk together the 4 (100g) egg whites, 1 large egg, 1 1/3 cups (10 2/3 oz) buttermilk, and 1 tablespoon pure vanilla extract. Set aside.
- In the stand mixer bowl fitted with the paddle attachment or large bowl with hand mixer, beat the 10 tablespoons (140g) unsalted butter and 1 1/2 cups (300g) granulated sugar on medium speed for 2-3 minutes, stopping to scrape down the sides of the bowl.
- Slowly add the dry and wet ingredients to the butter and sugar mixture, alternating each mixture about 1/4 at a time. Allow the mixture to mix properly after each addition before you continue adding.
- Beat mixture for 1-2 more minutes once all the ingredients have been added. I usually scrape the sides down and whip the mixture by hand a few times with a spoon or baking spatula before pouring in the pans.
- Divide the batter evenly between the two baking pans. I place each pan on the scale to divide them evenly. Smooth the top with a cake spatula.
- If using cake strips, put them on now. Tap the pans on the counter a few times to level out the cake batter and to reduce bubbles.
- Place the pans in the center of the preheated oven and bake for 20 minutes. Rotate the pans, and continue to bake for 10-15 more minutes, or until the top feels set and doesn't jiggle, the edges are pulling away from the pan, and a toothpick inserted in the center comes out clean. The cakes should be golden brown.
- Remove the cakes from the oven and allow them to cool in the pan for 15 minutes. Flip the pans and allow the cakes to cool on a wire rack. You can also put the pans in the freezer to accelerate the cooling process. Then pull the cakes from the pans.
- Wrap your cake layers with plastic food wrap and place in the freezer for at least 30 minutes before frosting.
Buttercream Frosting Instructions
- Whip the 1 cup (225g) unsalted butter and 1/2 teaspoon salt for about a minute using a stand mixer fitted with a paddle attachment, on the low setting. You can use a hand mixer instead, if you don't have a stand mixer.
- Add in the 1 tablespoon vanilla extract, continuing at a low speed.
- Sift in the 1 lb (454g) confectioner's sugar a little at a time, beating it on low. Halfway through, add in 1 tablespoons heavy cream.
- Scrape the bowl down to ensure an even consistency. Beat until you have an even, fluffy consistency.
- Add additional tablespoons of cream for a thinner consistency. Add more sugar for a thicker consistency.
- If you are coloring the buttercream frosting, add in the gel food coloring and beat on low until it reaches the color you are aiming for. Do not add the food coloring until your frosting is fully mixed and you are happy with the consistency.
Notes
-

Christmas Stovetop or Crockpot Potpourri
Share this post Christmas Stovetop or Crockpot Potpourri is such a fun gift to give to anyone in your life – friends, family, coworkers, teachers,…
-
Gluten Free Big Mac Quesadilla Burger
Are you craving a Big Mac burger from McDonalds?? I was too and I found that I love this quesadilla burger much more than an actual burger!
-
Gluten Free Ramen Noodles Recipe
Gluten Free Ramen Noodles recipe. A easy, quick way to make gluten free ramen noodles at home. You don’t have to miss ramen noodles anymore!


